
Chapter 23
Crossing Tomatoes
A lot has been written about crossing tomatoes and making your own hybrids. Most of the instructions are complicated and far more detailed than need be. This has led to confusion, making this process seem more difficult than it is. I was taught how to make crosses in a straight forward simple manner that results in lots of success. In fact, more than half of my initial attempts at making crosses were successful. Here is what to do.
First, decide which tomatoes are to be crossed. Make certain the plants are in close proximity in your garden. Right next to each other is best, because you will be more easily able to examine blossoms on the plants to see which are ready. Another suggestion is that you prune the plants very little prior to making your crosses, so that you get a maximum number of blossoms to work with.
Since you will be doing extensive and complex surgery on the female-to-be blossom, I would suggest that you select the variety with the bigger blossoms as the female. It is easier to dissect a big blossom than a small one. You will eventually be removing the anther cone from the blossom you choose as the female, thereby emasculating it. The male blossoms, from the variety to be used as the pollinator, will be much easier to prepare.
The only tools you need to prepare the blossoms are a small pair of tweezers and a small pair of scissors. They should be cleaned by washing them with soap and water.

When it comes to making a cross, timing is everything. You must know exactly when it is the right time to emasculate and later pollinate the female-to-be. The exact blossom, you will be emasculating and later pollinating, must be chosen carefully. Study the blossom picture and anatomical drawing on pages 184 and 185, as one picture is worth a thousand words.
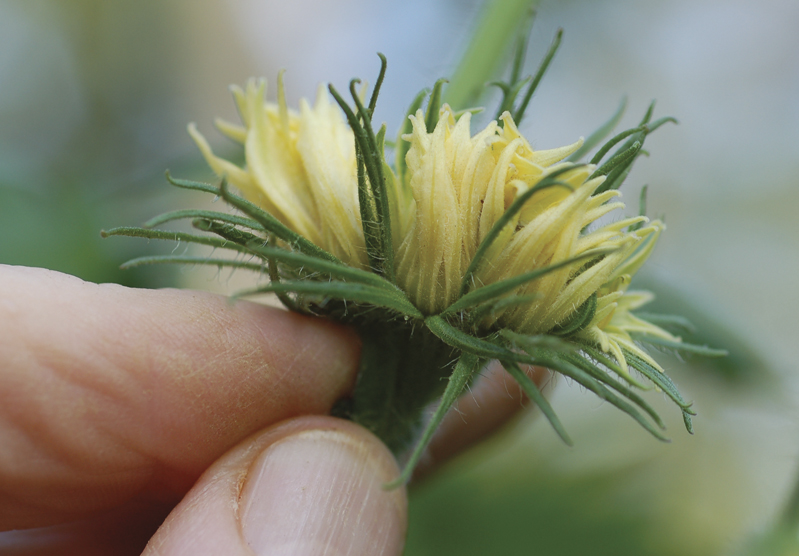
In preparation for emasculation, watch your blossoms closely, and as they begin to swell, look for the very first sign of any yellow-color. The yellow will be the petals beginning to mature and showing through a small opening in the sepals. The sepals will open the very slightest amount, and the yellow petals will just barely come into view. When that occurs, it is time to emasculate the blossom. If the blossom has opened, it is too late. It will have pollinated itself already. Fear not, there will be other blossoms!

Very carefully open your chosen blossom so that you can see the anther cone. You may need to dissect away one or two petals with your tweezers to get a better look at the anther cone. Carefully work your tweezers between the anther cone and the style. Grasp the anther cone midway down, and while holding the base of the blossom with the other hand, lift up pulling off the anther cone. It may come off in one or more pieces. Most of the petals and all of the sepals will remain with the blossom. When doing this procedure, be very careful not to damage the stigma, style, or ovary – the female parts of the blossom. Leave the sepals and as many of the petals as possible intact. These will later signal the time to pollinate.
In preparation for the actual emasculation, it is important that you practice. There are always a lot of blossoms to practice on to perfect your technique. With practice, you will soon become quite adept at emasculating tomato blossoms.

Emasculated flowers should be covered to prevent contamination. By covering the blossom, you increase the level of certainty that you have made a clean, uncontaminated cross. The cover also helps if you have hot, dry, or windy conditions. The blossom can also be covered with plastic bags, cheesecloth, or used fabric softener sheets, which are readily available in your home. The male blossom should be covered as well.
For the next day or two following emasculation, at around 10 am, after the outside temperature has risen and all signs of any condensation are gone, check the emasculated blossom to see if it shows signs of opening. The sepals and petals you left on the blossom will open one or two days after emasculation, and that is the signal it is time to pollinate. The simplicity of this method is that the blossom tells you when to pollinate.
When the sepals and petals of the emasculated blossom are opened all the way, it is time to look for pollen. Freshly opened flowers that are all the way open are the best and easiest source of pollen. Go to the tomato plant which is to be the male portion of the cross. Find a newly opened blossom – you need only one. Remove the blossom from the plant with your scissors and then remove the style. You may transfer pollen from the male flower to the female by placing the male blossom over the female blossom using its stem as a handle. Twirl it around a few times and you will get enough pollen on the stigma to pollinate it. If the male blossom can be situated so that it will rest on the female; that is even better. Placing the anther cone over the stigma and style is the preferred method of pollination in that it both pollinates and protects the female blossom. Be careful not to damage the stigma or the style of your female. Be sure to cover up your pollinated blossom again.
Another method used by some growers to pollinate the emasculated blossom is to carefully remove pieces of the anther cone from the male and then gently touch them to the stigma of the emasculated blossom while being cautious not to damage the female. Though this method is easier, the success rate is a bit lower.
To increase the chances of a successful cross, pollinate the emasculated blossom two days in a row. Stigma are receptive to pollen for one to two days depending on the humidity – high humidity is preferred. Remove the smaller blossoms in the cluster where you are making the pollination, so as to reduce competition for nutrients.
It is usually easiest to get successful crosses if they are done early in the flowering season, but not necessarily the first flowers. Wait until the weather warms up enough so that naturally pollinated blossoms will set. Then do your crosses. Early flowers, weather permitting, are much more likely to be successfully pollinated. Don't bother doing any crosses during hot spells or on wet or excessively windy days, as even natural pollinations do not set tomatoes well then. Make multiple crosses, because not all will take. Outdoor crosses are most successful if done under cool relatively wind-free conditions.
Observe the blossom pollinated, and if you have been successful, you will soon see the tomato begin to grow. If pollination is not successful, the flowers will abort within two to three days. Mark your tomato cross by trimming off the tips of some sepals or by tying a small jewelry tag or piece of string on the branch.
Grower Comments on Crossing Tomatoes
"When the blossom is just starting to open and the yellow is showing, carefully spread it open and remove the anther (the cone around the stigma). Try not to remove the bottom-most petals. Later, these will be the signal that it is ready to accept pollen. After emasculation, cover the blossom and then watch the remaining petals. When they open fully, it is time to pollinate. The plant is telling you the absolute best time to pollinate, and this usually will occur around 10am on a warm sunny day. I like to pollinate at least two days in a row. After I strip a blossom, I cover it with a piece of used fabric softener sheet and hold it on with a paper clip (very crude but effective). I label it with a string attached to the stem of the stripped blossom, and when I cover the blossom, I clip it to the label. It holds. You only need it until it sets fruit. When you can see the small tomato you can uncover it." Minnie Z.